Refreshing the Pedal Box

Mark Olson

True Classic
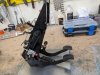
I finished the work on the pedal box today. Specific items:
  • Powder coated the box and pedals
  • Had a bronze bushing made to replace the worn out plastic
  • Replaced the clutch return spring peg
  • Moved the pin for the clutch rod down ~3/8" as suggested by MWB for my K20 setup
Here are some pics of the finished unit -just need to install the feed hoses when they come and it is ready to put in the car:
Finished Pedal Box 1.jpg


Finished Pedal Box 2.jpg


Finished Pedal Box 3.jpg


I have a box from a '74 and from a '76. It was interesting to note the differences:

The brake return spring on the '76 has an extra wind:
74 and 76 brake pedal spring.jpg


The pedal box on the '74 has side trays attached:
74 and 76 pedal box.jpg


And you will notice on the above picture the '74 box extends all the way to the aft attach points whereas the '76 is cut short.

The clutch return spring peg on the '76 was worn out (replaced with the '74 peg as I used the '76 box):

76 clutch retun spring peg.jpg
 

Attachments

  • Finished Pedal Box 2.jpg
    Finished Pedal Box 2.jpg
    331.1 KB · Views: 103
Nice work. What brakes are you planning on using up front?

I realized (looking at the assembled pic) I put my clutch return spring on backwards (again) :D
 
I will start with the stock brakes, and upgrade if I think necessary after I have run it a bit.

I think you will find them a touch hairy if you do any hard pulls & then try to stop in a reasonable distance - even with the VicAuto BBK I wasn't really happy
 
I had a local machinist make it up for me.

That's the way I did mine - having the bronze (sourced from McMaster Carr) reamed for the proper tolerance fit turned into an expensive proposition - I did have him make a new inner shaft as well, but still - it was close to $200 in machine shop labor ($100 an hour around here)

IMG-20200214-160316.jpg
 
I kept going back and forth on the pedal box, but after looking at the cost of the bushing and the level of modification to the box to fit decent cylinders I just fabed a bracket and bolted in a set of Tilton pedals.

View attachment 41839View attachment 41840
Hey Jimmy, have you described this project in another thread somewhere? You should, it looks to be a very alternative to the dual master upgrade idea and I'd like to hear more details on it. ;)
 
Hey Jimmy, have you described this project in another thread somewhere? You should, it looks to be a very alternative to the dual master upgrade idea and I'd like to hear more details on it. ;)
This went into my '74 K20 project. I don't have a real thread on that swap as most of the mundane parts of the swap have been covered extensively on other builds. Installation requires nothing more than a fabed bracket as shown. Attaches in the rear to the original pedal box studs. On the right it attaches to the front heater box stud, and on the left it has a couple of bolts through the plenum (right of the wiper motor). I cut off the front of the original pedal box for a seperate steering column mount. No need to integrate the two brackets - the fabed bracket is going nowhere once it's bolted in. The only problem in making up a bracket is the working environment under the dash is not exactly condusive to laying anything out. To avoid ending up in traction, I made it in small bites over about a week.
 
This went into my '74 K20 project. I don't have a real thread on that swap as most of the mundane parts of the swap have been covered extensively on other builds. Installation requires nothing more than a fabed bracket as shown. Attaches in the rear to the original pedal box studs. On the right it attaches to the front heater box stud, and on the left it has a couple of bolts through the plenum (right of the wiper motor). I cut off the front of the original pedal box for a seperate steering column mount. No need to integrate the two brackets - the fabed bracket is going nowhere once it's bolted in. The only problem in making up a bracket is the working environment under the dash is not exactly condusive to laying anything out. To avoid ending up in traction, I made it in small bites over about a week.

Do you have a pic with the masters and lines installed? Curious if you remade all the lines or did as I did, fitted the stock lines to the junctions, and just made new lines off the masters.
 
Do you have a pic with the masters and lines installed? Curious if you remade all the lines or did as I did, fitted the stock lines to the junctions, and just made new lines off the masters.
I have not gotten that far yet. I want to buy the cylinders closer to the final install to make sure they are "fresh", but the overall plan has always been to rip out all the original lines, connector blocks, etc. and replace with new 3/16 line with -an3 hardline fittings. As long as the car was virtually taken down to a bare shell, I wanted to eliminate as many problem areas as possible.
 
This went into my '74 K20 project.
Thanks Jimmy. I'm not sure how close the '74 is to the later X's. But the principle should be the same. So if you are interested please take more pics and start a thread on doing the pedal box conversion the way you did. I think it will be valuable to others (like me :D).

I agree about making all new lines at this point. Then one can also decide what fittings they prefer; SAE, bubble, or -AN....depending on the components used.
 
I'
Thanks Jimmy. I'm not sure how close the '74 is to the later X's. But the principle should be the same. So if you are interested please take more pics and start a thread on doing the pedal box conversion the way you did. I think it will be valuable to others (like me :D).

I agree about making all new lines at this point. Then one can also decide what fittings they prefer; SAE, bubble, or -AN....depending on the components used.
l'll document the install when I get to that point in the project. I tend to do all the sub-assemblies, bag, wrap and store them so after paint the car can be rapidly assembled - at least 6 months away.
 
I certainly cannot complain, I rarely remember to take any pictures until everything has been assembled for the final time....when it's too late. :rolleyes:
 
Back
Top