visualistics
TJ
Just wanted to start a proper build thread here to document this farce… bit of background, I bought my X last spring and enjoyed tinkering with it and pounding around on the stock 1300 engine, but my goal from the start was to eventually swap the engine for something with more power, better drivability, and better reliability.
I read the many engine swap threads here to determine my path forward. It came down to either the B or K swap from Honda due to both of them being pretty well documented and proven. K swap is awesome but too expensive for me, and requires a fair bit of chopping and fabbing. So the B seemed like the obvious way forward. B series engines came in many 90s Hondas and have a big aftermarket and are simple and reliable units for the most part. Many of the good B engines are getting expensive now too, so I eventually settled on a non-VTEC B18 out of a DC4 Integra. This ran me $1k for the engine, 5-speed trans, headers, intake, one axle (other was no good) and some odds and ends. This should be good for 140hp (doubling the X) and is a simple setup. If I want to down the road, there is aftermarket stuff to boost the power and I could even go for the “poor man’s R” and slap a VTEC head on this for pretty cheap. Could also go turbo on the B18 if I wanted, but packaging and managing heat from the turbo would be a challenge in the tight X engine bay. But for me the B18 seemed like a good middle ground that gives me options.
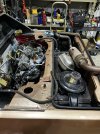
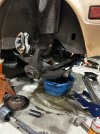
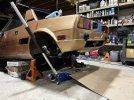
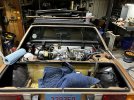
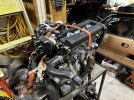
So where are we at now? I ripped the X one last time, and parked it in my shop for the winter. I’ve got basically everything in the engine bay disconnected and all fluids drained, rear control arms off, and all that’s left to drop the engine is to remove the mounts and do the damn thing. Trying to dedicate Fridays to working on the swap each week and will document as I go.
Oh, I should mention I am just a shade tree mechanic and have wrenched on (and broken) many things but have never done a full engine swap before. but that’s the fun! Learning as we go and improving our skillset.
I read the many engine swap threads here to determine my path forward. It came down to either the B or K swap from Honda due to both of them being pretty well documented and proven. K swap is awesome but too expensive for me, and requires a fair bit of chopping and fabbing. So the B seemed like the obvious way forward. B series engines came in many 90s Hondas and have a big aftermarket and are simple and reliable units for the most part. Many of the good B engines are getting expensive now too, so I eventually settled on a non-VTEC B18 out of a DC4 Integra. This ran me $1k for the engine, 5-speed trans, headers, intake, one axle (other was no good) and some odds and ends. This should be good for 140hp (doubling the X) and is a simple setup. If I want to down the road, there is aftermarket stuff to boost the power and I could even go for the “poor man’s R” and slap a VTEC head on this for pretty cheap. Could also go turbo on the B18 if I wanted, but packaging and managing heat from the turbo would be a challenge in the tight X engine bay. But for me the B18 seemed like a good middle ground that gives me options.
So where are we at now? I ripped the X one last time, and parked it in my shop for the winter. I’ve got basically everything in the engine bay disconnected and all fluids drained, rear control arms off, and all that’s left to drop the engine is to remove the mounts and do the damn thing. Trying to dedicate Fridays to working on the swap each week and will document as I go.
Oh, I should mention I am just a shade tree mechanic and have wrenched on (and broken) many things but have never done a full engine swap before.
but that’s the fun! Learning as we go and improving our skillset.